Assembling a (Princes Channel) wreck…

1 05 2009

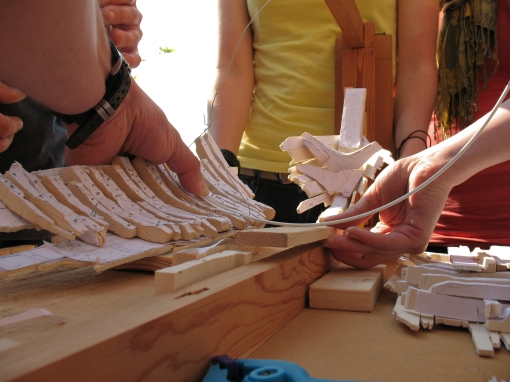
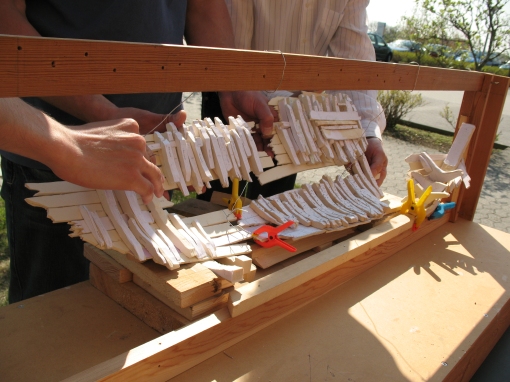
Halfway through our modeling course we made a first attempt to join the five different hull sections of the Princes Channel Wreck. On the one hand we wanted to establish the “missing link” between the bow and the hull of our ship and on the other hand we hoped to get a first idea about the size of the ship.
Assembling the Princes Channel wreck

Assembling the Princes Channel wreck

We mounted the bow section on a large wooden frame and then assembled the remainder of the hull using temporary fixings such as wire and chocks. Thin plastic splines were used to control curvature and assure fair lines. Although this was our first attempt, which involved a lot of improvisation, we got a first idea about the size of the Princes Channel Wreck or Gresham Ship. it looks as if we are dealing with a merchant vessel of at least 25m length at the level of the lowest (and possibly only) continuous deck.
All sections joined

All sections joined

As a next step we’re going to build a larger reconstruction frame and attempt a more permanent reconstruction which will also allow taking off a first set of lines. At the same time the working groups have started to work on larger 1:10 scale wooden models in order to reconstruct the construction sequence of the Princes Channel Wreck.

Jens Auer
Assistant Professor
Maritime Archaeology Programme


Piece 4 of the Princes Channel Wreck – week 5

2 04 2009

In making the 1:20 model of the bow section of the Princess Channel Wreck we used many of the same procedures earlier mentioned. Since this part of the wreck had many heavy timber parts, it was natural to make some pieces in timber. The idea was that the model in this way would both be sturdier and get an improved appearance, than if constructed of cardboard alone. The only pieces made in cardboard were the strakes. Gluing 1mm and 2mm cardboard together gave us the general width needed to reconstruct the planks. The rest of the timber pieces; the keel, stem post, stemson and the frames were all made of wood. A 1:20 print was glued on to the moulded part of the wood and cut out using a jig-saw. The sided part was constructed in the same matter. Finishing touches and details, like rabbets and scarfs, were cut using a knife.
Figure 1: Frame.

Since the wreck was not taken apart before recording, not all of the prints of the timber pieces had a full outline and some estimated guesses were needed also in order to calculate how the pieces were connected to one another. The Princess channel boat is believed to have been built frame first, so when putting the different parts together, we started with connecting the keel and stem post using small nails. For calculating the angle these should be situated, we used the outline of the stemson, which later was attached on top of the keel and stemson. Even though the original progress of building the ship started with the frames, we decided to begin with fastening some of the strakes. This was done to try to find the correct place to position the frames. After the lower strakes were attached, the frames were placed before the last strakes were fastened.

Figure 2: Bow section; keel, stem post and three strakes attached

Figure 3: Bow section; keel, stem post and three strakes attached

Marja-Liisa Petrelius Grue & Christian Thomsen


Piece 3b of the Princes Channel Wreck – week 4

26 03 2009

This week we have started putting our pieces together. Our piece has two layers of frames. Originally the boat was built with only one layer, and later the planking was taken off to add another layer on the outside before the planks were put back on, a technique that is called furring. The wale was not removed during the process, and became the stringer, after the furring.


When we made our frames we used the digital archive in Rhino; some of them were not fully recorded, and we did not get all the additional information we needed to make them from sketches or photos either. We had to improvise with some of the pieces by comparing them to others that we had more information about.


After cutting out all the pieces in cardboard, we glued it together using the drawing of the inside overview plan of 3b to locate each one of them. Initially we glued the outer frames to the stringer. We then understood that we should make a cut in them, were the stringer could fit in to make it an even structure. When making the cut for the stringer we realized that some of the improvised frames were not thick enough, that the stringer would split the frames in two. Instead of making the frames again, we decided to glue more layers of cardboard on to the already made frames to make them thicker. We have also worked on the water way and the ledge.


Konstantinos Alexiou, Liv Gardsjord Lofthus & Cate Wagstaffe


Piece 3a of the Princes Channel Wreck – week 3

19 03 2009

We began our piece of the project by constructing the frames. This was for two reasons, the first more practical reason being that the other teams had begun building the planks first, leaving the tools for building the frames free. The second more theoretical reason was that the Prince’s Channel wreck appears to be a frame-first built ship.

To begin constructing the frames we printed out a Rhino recording of each frame in a scale of 1:20. There were two views of each frame, one of the sided side and the other of the molded side. Our team decided to make the frames out of wood to provide a more authentic reconstruction. In each case we first glued the molded side of the print-out to a piece of wood. Then we traced around the lines with a jig-saw. In some cases all of the lines were not present as they were obscured by other timbers during recording. In this case we needed to reconstruct the lines. We did this in three ways, 1) revisiting the Rhino file, 2) looking at the original recording sheets, and 3) imagination. Once the molded side was cut out we glued on the print-out of the sided side to the top of the molded side and cut that out with the jig-saw. In all we had 28 frames.

Piece 3a

And now to the planks! These were very straightforward. We made these in cardboard as this is more flexible. The planks varied in thickness so we chose the most common thickness of 3mm (at a scale of 1:20). Again we printed out the top view of the planks from the Rhino files, glued them to the cardboard. As we were using cardboard of 2mm and 1mm, we alternately glued the print out to one and traced around the second with a scissors or a knife. Then we glued these two pieces together.

Sarah Fawsitt & Bente Grundvad


Piece 2 of the Princes Channel Wreck – Week 2

12 03 2009

For piece 2 of the Princes Channel Wreck we followed a similar process as piece 1 for the 1:20 scale model of the planks, whereby we used the lines from the digital recording (Rhino software) to trace out the planks and we used 1mm and 2mm cardboard glued together to achieve the appropriate scale thickness.

When focusing on the framing timbers of the wreck we were faced with the decision of whether to use timber or cardboard as both materials had their advantages and disadvantages. Using timber gave a neater finished product, however they took longer to produce and were also more likely to break the blades of the saws we were using. By gluing cardboard of varying thicknesses of 1mm, 2mm and 4mm it was easier to cut out the molding but, of course the cardboard being more brittle than wood, took more care not to damage.

In the end we settled on the cardboard option and were able to produce the framing timbers within 4 evenings of work. Again we printed out and used the lines from Rhino as guides for the outline of the sidings and moldings of the framing timbers.

We encountered problems where some views of the framing timbers were hidden from the camera and total station recorder. The measurements we then used were deduced from a combination of studying other fully documented timbers, photographs and some guesswork. Again we glued cardboard to achieve the desired siding thickness and with the jig-saw cut out the molded shape. After sanding down edges and recesses for the stringer we glued on the Rhino images onto the relevant faces.

The images show the stages of producing a framing element and the final picture shows most of piece 2, some elements are in the process of being made. We anticipate that more work will need to be done on the unknown aspects (reshaping) on the individual pieces once assembly of the planks and frames will commence.


Delia Ní Chíobháin & Andrew Stanek


Piece 1 of the Princess Channel wreck – Week 1

4 03 2009
We considered building the frames of piece 1 from cardboard or wood and we were undecided, so we decided to build the planks from cardboard first. From the archive we printed of 1:20 scale individual planks from piece one on A4 paper. We measured the A4 print outs of the individual planks and compared them to the 1:20 diagram of all the pieces of the Princess Channel wreck.
When we determined the individual plank print outs had printed at 1:20 scale, we cut out individual plank print outs in order to provide a stencil for our planks from paper. From the archives we recorded the thickness of each plank. We then calculated the most appropriate combinations of cardboard layers to make up the overall thickness of each plank. We used our paper stencil on the first layer of cardboard to cut out the plank shape by gluing the template to a small rectangular piece of cardboard and cutting with a knife around the outline. The first layer of cardboard cut from the stencil was the thinner layer of two centimetres. The combination of the thinner layer of cardboard and paper was glued to the thicker layer of cardboard of four centimetres thickness and used as a stencil to cut out the second layer of cardboard. Once the shape of the plank had been cut out from the second layer of cardboard the process was complete.
Completed planks

All in all the construction process on the first day began at 12.30 and finished at 16.30 and during this time we managed to complete nine planks.

Martin and Rikke


The Princes Channel Wreck model building project

1 03 2009
As part of the syllabus this semester the students of the Maritime Archaeology Program are conducting model building of the remains of the Princes
Channel wreck.

The Port of London Authority discovered the ship in 2003 in the Thames Estuary during dredging operations and Wessex Archaeology carried out the excavation and recovery.

The remains were lifted in 5 separate pieces, which make up one part of the port side, approximately 14m long. The vessel was a carvel built merchant ship and also conveys evidence of ‘furring’, a practice of doubling up all framing timbers – this is the only known archaeological evidence of this shipbuilding technique.

The cargo included folded iron bars, lead and tin ingots and four guns. Dendrochronological investigations have revealed a construction date of soon after 1574 and that the oak used most likely came from eastern England (Auer & Firth, 2007).

More detailed information may be found here.

The model building workshop


In the coming weeks each group working on the individual pieces will write about their experiences and attempt to determine the construction methods
and sequences utilized in the ship’s original creation.